(The above is a composite of 8 images with exposure times in the 5min and above range.)
HDR is one of those buzz words in Photoland that usually invokes a set of viewer expectations and a bit of mystique. In a nutshell, the photographer is “merely” taking the same photo multiple times, and at various settings, such that they can get the over exposed and under-exposed elements properly exposed in a single image. The basic example is a bright sky; You want the bright sky to show the great cloud formations, but you don’t want to alienate, say, the trees in the foreground. (Poor trees!)

(This image is one I am using as a learning piece and is not meant to be a token of great composition.)
Here are the specifics for each photograph used in this composite: Composite of 4 images. All images captured at ISO 100, focal length 48mm, ƒ/5.6
Shutter speeds:
1/250
1/640
1/1600
1/4000
I have started using HDR because I take a lot of nighttime photographs. This means that if I am doing a very long exposure and there just so happens to be, for example, a street light in frame, then that street light is going to end up extremely bright compared to the rest of my image. This is where HDR comes to the rescue.
How do you magically make an HDR image?
The first step is to “bracket” your photos. This means that you not only take the best exposure you can, but you also take pictures that are both over exposed and under exposed. Depending on the situation, you may want a few extra (the above image uses a total of 4 images) or many more. The goal is to get the darkest elements in your image exposed (while over exposing everything else), getting the brightest elements properly exposed (while under-exposing everything else), and everything else in between.
Here is an example which I used for the image above:
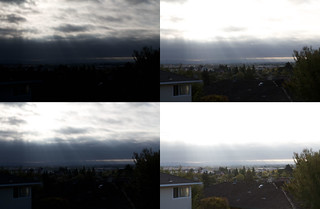
(The specific camera settings are listed above.)
As you can tell, to get the clouds exposed the rest of the image is too dark. On the flip side, to get the foreground exposed, you can’t even make out the clouds because the sky is so bright.
How do you make all these images into a single image?
This is where the Magic comes into play. You’d think that there would be a magic tool that takes all of these images and “just makes it happen”. You would be almost right!
The key word is “almost“.
There are many plugins that do indeed do this, but you have to get your hands dirty to really make the image you want. Photoshop has a plug in and there are many third party plugins out there depending on what you are looking to do. Personally, I have settled on HDR Efex Pro by Nik Software (note: I have no affiliation whatsoever with this product or company) as a plugin for Aperture (where I do all of my sorting and nearly all of my post production at this point).
I will get into the finer details at a later point, but I am still learning as HDR is another bag of chips all together.
I am also experimenting with various camera settings (e.g., the image below was taken at ƒ/11 instead of ƒ/5.6 as compared to the previous HDR image) and number of images for composites (HDR is a way of “compositing” multiple images into a single image, thus the use of the term). Here is the same exact image using 8 images instead of 4 and I set my camera to a higher F stop (f/11) than the previous image (which I had my camera set to f/5.6):
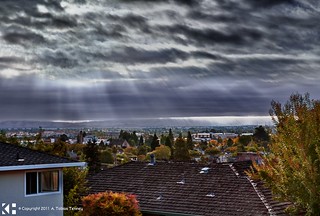
Here are the specifics for each photograph used in this composite: Composite of 8 images. All images captured at ISO 100, focal length 48mm, ƒ/11 (except for the first image which was needed for a more exposed bracket image; note that this image was also used in V1). Here are the shutter speeds:
1/250 (ƒ/5.6)
1/200
1/250
1/320
1/400
1/800
1/2000
1/4000
I will write more about HDR as I become more and more familiar with it. In the meantime, check out my full HDR gallery on Flickr: